

So my first article, in my Joomla 4-surroundings, is about OpenAi and the use of the models given out by openai.com. This is a big topic and I thought I'd split it up into several articles/topics. This is not a scientific article in any way. It's just meant as "notes" or "my experience" in a straight forward language. It's like I said in "tomprat.meek.wf": it's my doodle-pages. My "paste"; remembrance-page< clipboard
As a start, I would say that what openai.com has come up with is certainly fun and interesting, and if used properly; useful. I was intrigued from the beginning when I logged in to their site and created an account. The first thing I did was to create a simple application called "Simple OpenAI example based on GPT3, text completions". It's written in C# - WPF, using Visual Studio, and does some basic stuff using their REST-API. There are other libraries written in different languages out there (and C#), but I wanted to start from the beginning and learn a little bit more than just write queries in a text-box. The name of the application is somewhat not true since I've expanded the functionality to more specialized functions as mentioned below.
I've tested the API and can divide it into 4 parts(for now):
- OpenAI - Completions
- "code-davinci-002" model. Code Generation
- DALL-E. Image creation
- Edits
The App
OpenAi.com gives you some examples of how-to-start using the REST-API so that you can start off really quickly. Like downloading their python-libraries and using the commandline interface. And that's how I started. I created a batch-script (in windows 10), to write some queries using their executable "openai". Very simple.
The batch-file
:start
@echo
@echo Enter your request:
@set /P request=
@if /I "%request%" Equ "quit" goto :end
@openai api completions.create -m text-davinci-003 -p "%request%" -t 0 -M 1500 --stream

@goto start

:end
@echo press any key to quit
@pause>nul
The input will be somewhat limited, but to get started it's more than enough. But if you want experiment with "options" like temperature and top_p you will have to edit a text-file. This script goes in an endless loop until you type "quit". If you write "exit" it goes cRaZy ![]() . But for testing it's all good. You can use your arrow-keys to get previously typed queries and edit them. That's what I've found out is a must, since you will probably edit your query many times until you get a result which you are happy with. Like the pic below:
. But for testing it's all good. You can use your arrow-keys to get previously typed queries and edit them. That's what I've found out is a must, since you will probably edit your query many times until you get a result which you are happy with. Like the pic below:
The Linux Environment
I also wanted to try it out in the Linux environment and it works in the same way. Same executable name with the same parameters. But I thought I'd try out the Python API. Here's a short script to demonstrate the usage:
#!/bin/python
import os
import openai

openai.api_key = os.getenv("OPENAI_API_KEY")

if openai.api_key == None:
    print("Missing OPENAI_API_KEY")
    exit()

def ask_input():
    while True:
        input_text = input("Prompt: ")
        if input_text == "exit":
            break
        else:
            response = openai.Completion.create(model="text-davinci-003", prompt=input_text, stream=False, temperature=0, max_tokens=1500)
            print(response.choices[0].text)

ask_input()

print("Exiting application:\nOpenai-python-version")
A little bit more complex terminal program in the Linux environment
I have a tendency to jump from one thing to another, and I felt like one-line prompt-thing did not fit me so I built a terminal program using the ncurses-library(in C). See the pic below. 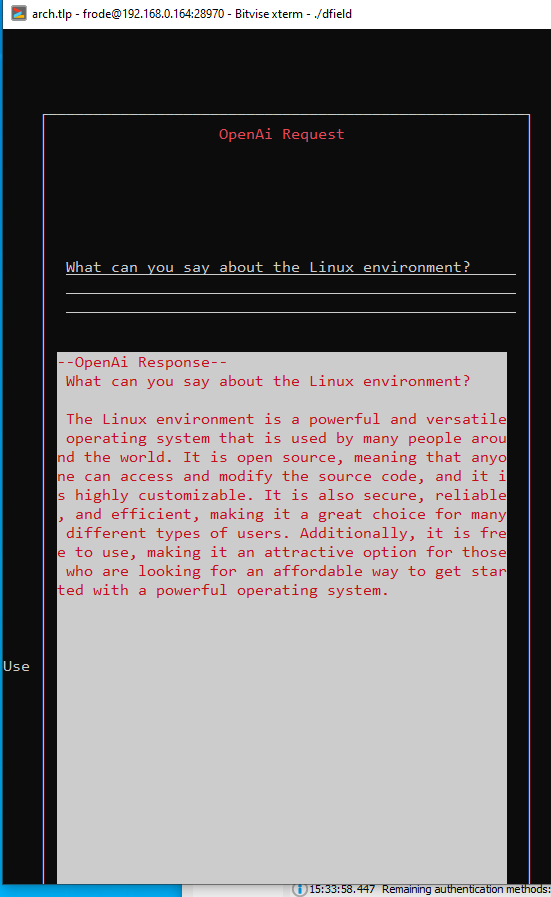
It uses the libraries ncurses and form. The request is written in a form with 1 field, where you can navigate with arrow-keys and skip from word to word. You can easily edit the text if you need to recalibrate the query. The response is then added to a window below the response. I thought that ncurses was the best option, if you want to keep it in a terminal. I would love to make something using Qt, but my machine(old laptop) has a very small screen and it's slow. Even writing that small app via SSH over the Wi-Fi was slow(and very irritating). That's why I did not write anything more on this article. It took me two weeks to try out different libraries/frameworks and settle down on something that might be a good enough solution.
I probably could of used the python library, but I don't/didn't feel comfortable with it, so I used good ol' 'C' ![]() .
.
The next step (for me) was to make use of the REST-API creating an application which is a little bit more handy and easy to use, so that it's easier to copy/paste results and/or queries.
WPF-application
As mentioned before you can communicate via their REST-API, sending data to and fro in the form of JSON data. Creating classes with the same structure as the JSON data is very easy in VS. Use "paste special", after copying the JSON-data. Rename class-names. And we're done.
I split my data into two classes. One for receiving and one for sending. For example, here's my class for the OpenAIResponse, which is an exact mirror of the JSON-structure sent from openai.com:
public class OpenAIResponse
        {
            public string id { get; set; }
            public string _object { get; set; }
            public int created { get; set; }
            public string model { get; set; }
            public Choice[] choices { get; set; }
            public Usage usage { get; set; }
        }

        public class Usage
        {
            public int prompt_tokens { get; set; }
            public int completion_tokens { get; set; }
            public int total_tokens { get; set; }
        }

        public class Choice
        {
            public string text { get; set; }
            public int index { get; set; }
            public object logprobs { get; set; }
            public string finish_reason { get; set; }
        }
The data sent to openai.com is held in a class called Options. The class holds all variables that openai.com will accept:
public class Options
        {
            public string model { get; set; }
            public string prompt { get; set; }
            /// <summary>
            /// Maximum number of tokens to get from response
            /// </summary>
            public int max_tokens { get; set; }

            /// <summary>
            /// No idea what this is. But I will have to find out
            /// </summary>
            public float temperature { get; set; }
            public float top_p { get; set; }

            public int n { get; set; }

            public bool stream { get; set; }
            public bool echo { get; set; }
            public uint logprobs { get; set; }
            public string stop { get; set; }
            public float presence_penalty { get; set; }
            public float frequency_penalty { get; set; }

            public uint best_of { get; set; }

            private string requestURL;

            public void SetURL(string url)
            {
                requestURL = url;
            }
            public string GetURL()
            {
                return requestURL;
            }
            public void SaveToJsonFile()
            {
                string json = JsonSerializer.Serialize<Options>(this);
                File.WriteAllText(savepath_openapi + options_file, json);
            }
            public void ReadAndAssignOptionsFile()
            {
                string file = File.ReadAllText(savepath_openapi + options_file);

                var tmp = JsonSerializer.Deserialize<Options>(file);
                this.model = tmp.model;
                this.temperature = tmp.temperature;
                this.top_p = tmp.top_p;
                this.max_tokens = tmp.max_tokens;
                this.stop = tmp.stop;
                this.n = tmp.n;
                this.logprobs = tmp.logprobs;
                this.frequency_penalty = tmp.frequency_penalty;
                this.presence_penalty = tmp.presence_penalty;
                this.best_of = tmp.best_of;

            }
            public void SetDefault()
            {
                bool status = File.Exists(savepath_openapi + options_file);
                if (status == true)
                {
                    ReadAndAssignOptionsFile();
                }
                else
                {
                    model = "text-davinci-003";
                    max_tokens = 1500;
                    temperature = 0;
                    top_p = 1;
                    n = 1;
                    logprobs = 0;
                    stop = "#!#";
                    presence_penalty = 0;
                    frequency_penalty = 0;
                    best_of = 1;
                }
                requestURL = url_completions;
                //set values to the controls in the options window
                wpOptions.SetControlValues();
            }
The variables are set in an options-window that looks like this: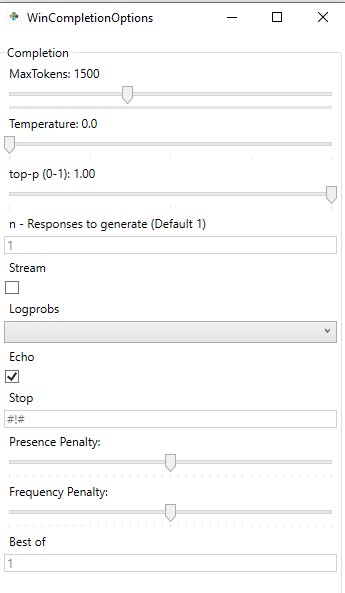
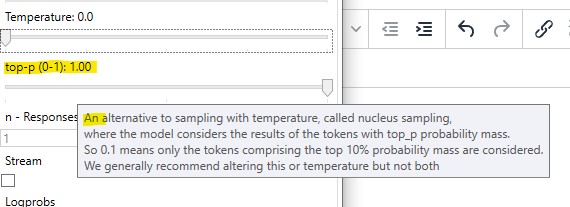
I did not do this in the first run. The options window was created late in the development, but it came up after that I wanted to see the difference in response from changing the variables values. I also set up a "Tooltip" like the picture below. Information taken directly from openai.com. Very useful I would say.
Point of it all is that it's not very difficult to set up an application to communicate with the OPENAI_REST_API. Anyone with a little bit of programming knowledge can do it. But the easiest option is of course to use a public/community library mentioned at their site.